
Improvised cabled cowl


I have had a few requests for this pattern so i will give it a shot.
Requirements: you will need to know how to cable!

NOTE! NOT FOR BEGINNERS - please read through the whole pattern before starting!


the idea is simple. Using irregular cables, you can create a unique look.
Use the following cables as an example
1. simple cable on 2p 6K 2p, cable the 6K.
2. Double cable - as above and repeat after 4 rows to get the double twist
3. Double elongated cable - like1 but repeated after 8 rows.

Ok, so if you have understood the above lets give it a go.
 You will need US size 10 needles and any yarn that goes with them. If in doubt, use thinner rather than thicker yarn
I used knitpicks worsted 100% wool.
About 100 gms should do. (no idea what that is in yards im afraid)

cast on 56 stitches on a spare piece of yarn - you will need to unpick this at the end to graft the ends of the cowl together. There is a tutorial on 'kitchener stitch' on my blog you can check out.
Using your cowl yarn , follow the following:
Row 1:Slip one (every 1st row from now on), k10, p1 till end (ending with a P1)
Row 2: slip 1, P10, K1 till end K1

thats the base of the pattern.

Now the fun starts.
Notice that you have 6 "cable" sections, or six knit sections with a purl stitch in between them.
Very randomly, add cables.
What is did was:
_______x_________x_______x_______x________x_________
    1                  2                  3            4             5                 6

after 10 rows of the basic pattern, I cabled section 3 and 6. Section 3 with a single cable and section 6 with a double.
I knitted another 10 rows then cabled sections 1 and 5 with and elongated and a double cable
Another 5 rows
a cable on section 2.

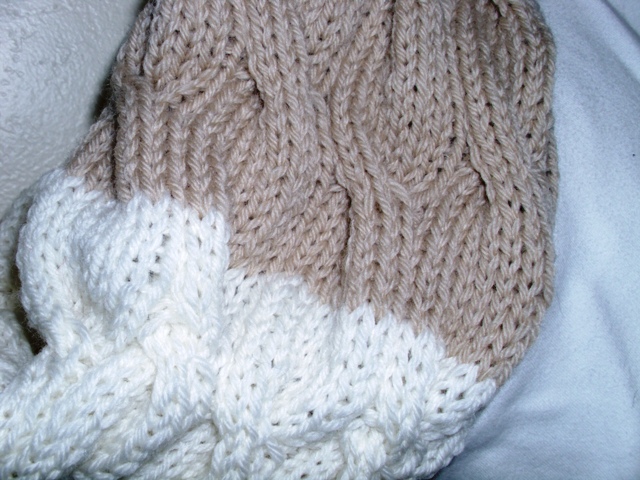
As you can see it is very random and disorganized...but thats what makes the cowl unique. No two are ever the same.
I also change color half way - just because i could! (actually I didn't have enough yarn but i got a great effect!)

When you reach the desired length, keep stitches on a needle. Unpick the waste yarn on the cast off and put the stitches on another needle. I used a 3 needle cast off but you can use the kitchener method found here
I like the 3 needle cast off. There is a good tutorial about that HERE.

If anyone actually makes this id love to post a picture of your work - and any improvements you can make to this pattern. if you find any mistakes please let me know

Comments

Isobel Morrell said…
My word that was complicated to read, let alone follow! Worth it though for those who have the stamina to follow it right through! It's a great finished product!

Used to knit a lot, but gave up because of all the counting, so this would not now do for me! Good luck to the others - and you, too!

All the best. Isobel from www.ColdhamCuddliescalling.blogspot.com
Mereknits said…
Thanks so much it is beautiful.
Hugs to you,
Meredith

Popular posts from this blog

2 needle fingerless gloves

This is an easy pattern that can be adapted according to your skill. I used worsted weight yarn and US 5 needles. You need just over 50gms of yarn. I also found that knitting them both at the same times ensures that they bout turn out the same ! Cast on 42 sts Knit 20 rows in k2 p2 rib on the 20th row place markers this way: k20 place marker, k2, place marker, k20 the 2 sts between the markers will form the increase for the thumb. Switch to stocking stitch (1 row K - right side- 1 row P - wrong side) Knit to marker, (20 sts) knit twice in the next stitch and in the one after that (the sts between the markers) K20 next row and all wrong side rows, Purl Knit 20 sts (you have reached the marker) knit twice in next stitch, K2 (till next marker) and K twice in the stitch before the marker K20 Continue this way, always increasing a stitch at each marker till you have 16sts between the markers. k 2 rows then with right side facing, k20, CO 16, k20 (shaping the thumb) nex

Hand Knitted Baby Cardigan Pattern

By Popular Demand! This is in one size only - takes for ever to figure out other sizes! For chest 10" - finished measurements about 14" Sleeve 3" You will need: 2 balls of a soft yarn that woks with 3.25mm (US 3 Needles) A button tension is 25sts and 50 rows for a 4x4 inch square If you are a beginner you may not understand this pattern - for more experienced knitters, I am sure you will see the 'pattern' of the decrease rows forming the raglan) I think this was originally a Debbie Bliss pattern i had written down somewhere so please forgive me if there are any mistakes - as i keep saying, I am hopeless at writing down patterns and i just had some notes on a scrap of paper! Back cast on 45 sts knit until back measures 3" ending with a wrong side row cast off 4 sts at beginning of next 2 rows leave remaining 37 sts on a spare needle sleeves (I  knit both at the same time) cast on 29 sts K 7 rows increase:* k3, m1, k to last 4 sts m1, k3

Straight Needle Sock Pattern

I dont like using circulars - and this is an easy pattern with just one seam up the back and the foot. Straight needle sock pattern MATERIALS: size 5 needles,(3.75mm) 100gms worsted weight yarn Abbreviations K – knit P – purl Tog – together PSSO – pass slipped stitch over Top of sock Cast on 42 sts, Work in K1 P1 rib for about 4 inches or for a high as you would like the socks to be Start shaping the heel: Knit 11 sts, Turn : knit on these 11 sts only for 16 rows, ending with a purl row Make heel Row 1:-K2, k2tog, k1, turn, Row 2: - slip1, P3, turn. Row 3:-K3, K2tog, K1, turn, Row 4: slip1, P4, turn. Row 5:-K4, K2tog, K1, turn, Row 6: slip1, P5, turn. Row 7:-K5, k2tog, K1. You have 7 sts left Pick up 10 sts on the side of the heel (the part you have just knitted), and knit them. Knit across the  sts left on the needle Turn and knit on the 1 st 11 sts only for 17 rows ending with a knit row Make the next heel as follows: Row 1: P2, P2tog, P1, turn, Row 2: slip1, K3, turn. Row3:- P3,